Quick start
Install Invoicepak, choose a plan and finish the Setup guide to send your first PDF invoice. It takes about five minutes.
This guide takes you from installing Invoicepak to sending your first invoice. It takes about five minutes.
Install Invoicepak
- Open the Invoicepak listing in the Shopify App Store.
- Click Install.
- Shopify shows the permissions Invoicepak needs. Click Install again to approve them.
Invoicepak asks to read your orders and customers. It needs them to put the order and customer details on each invoice. The app can't change your orders or customers.
Choose a plan
Right after installing, Shopify asks you to choose a plan. You need a plan to use the app, and there is a Free plan.
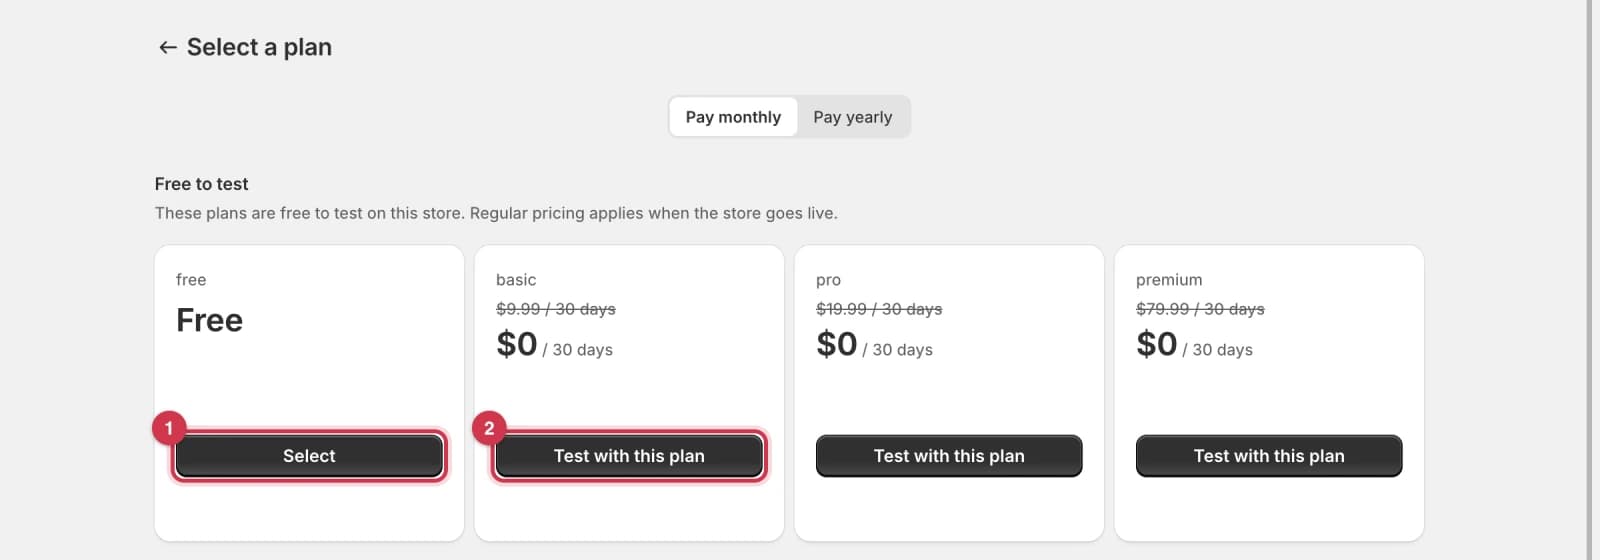
- To start for free, click Select under Free. The Free plan includes 5 invoice emails per month.
- To pick a paid plan, click the button under Basic, Pro or Premium, then approve the charge on the next screen.
You can change your plan any time from Billing in the app.
Open Invoicepak
After you choose a plan, Invoicepak opens on its Dashboard. To come back later, click Invoicepak under Apps in the Shopify admin sidebar.
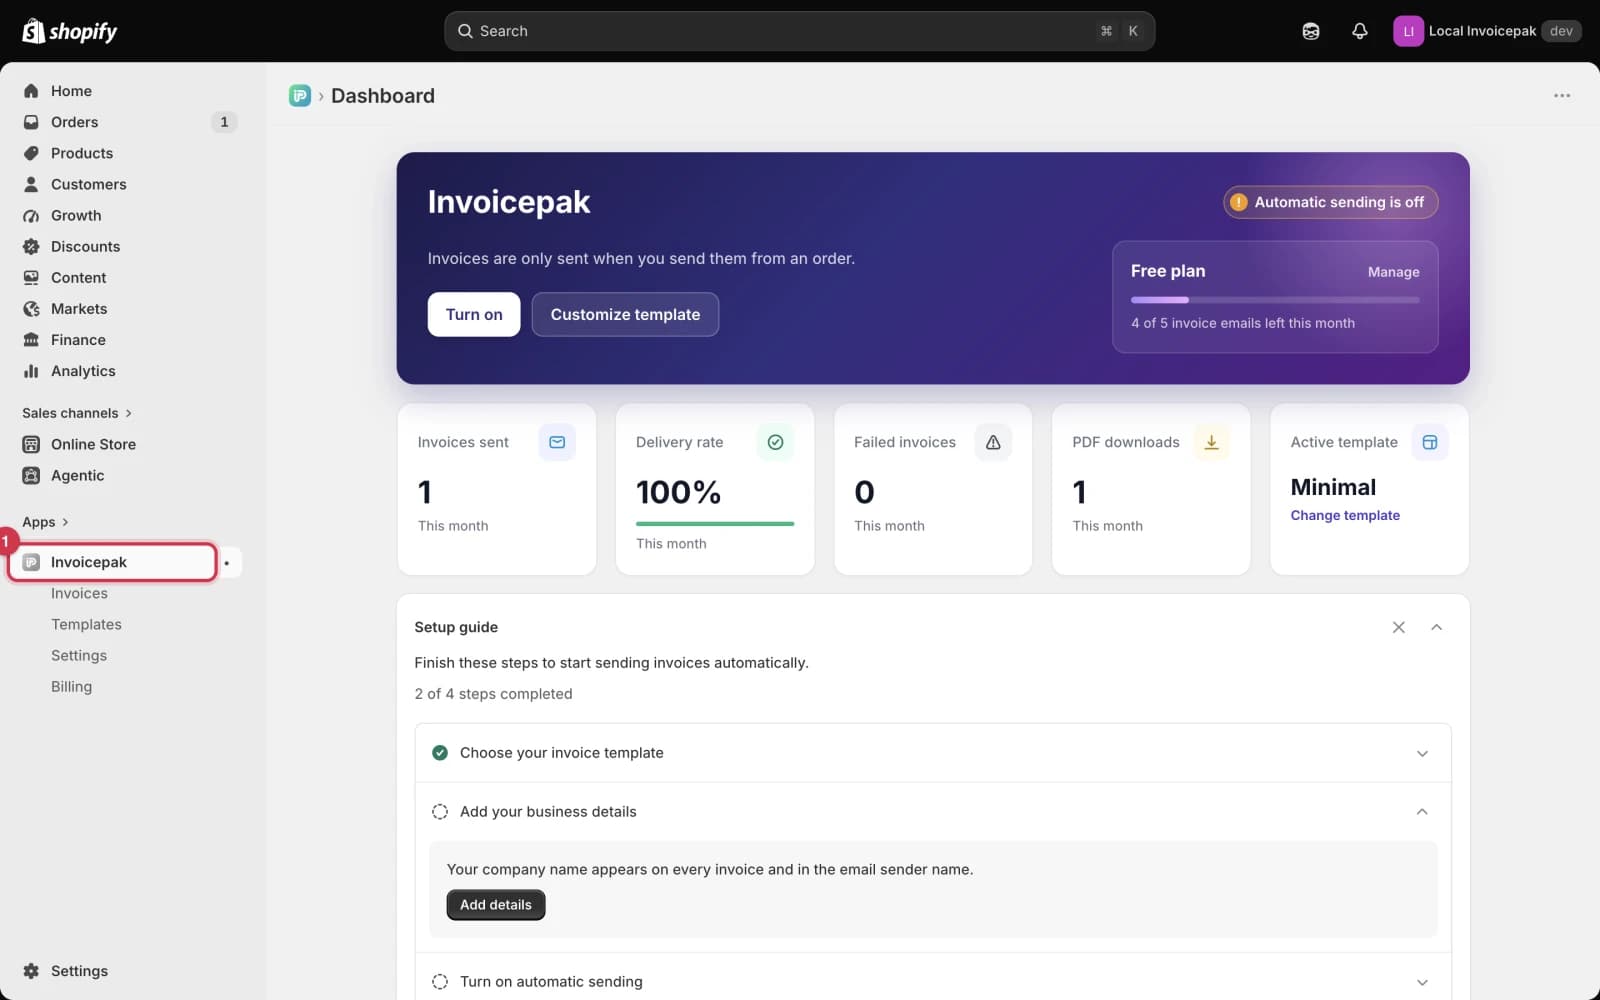
The app has five pages, listed under Invoicepak in the sidebar:
| Page | What it's for |
|---|---|
| Invoicepak (Dashboard) | Your invoicing status, usage, stats and the Setup guide |
| Invoices | Every invoice Invoicepak has created |
| Templates | Your invoice designs |
| Settings | Automation, customer email, business details and PDF options |
| Billing | Your plan and monthly usage |
Use the Setup guide
The Setup guide card on the Dashboard lists four steps. Complete them to start sending invoices automatically.
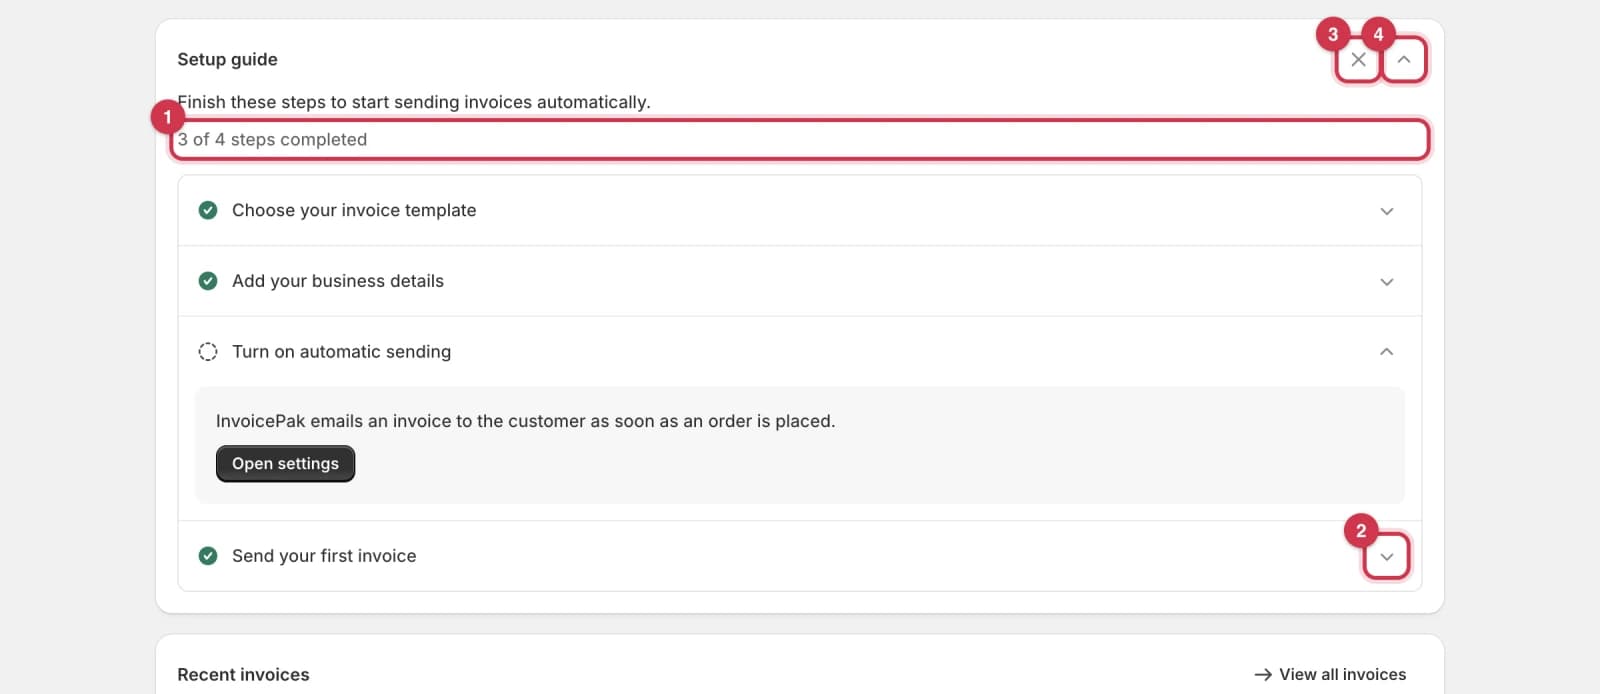
- The progress line shows how many steps you've finished, for example 3 of 4 steps completed. A finished step has a green check mark; an unfinished one has a dashed circle.
- Click the arrow at the end of a step to show or hide its details and its button.
- Click × to dismiss the Setup guide. It won't come back, but you can still do every step from the app's pages.
- Click the up arrow to collapse the whole guide. Click it again to expand it.
When all four steps are complete, the Setup guide disappears on its own.
Choose your invoice template
This step is already done for you after installing: Minimal is published and set as your default template.
To use a different design, open the step and click Choose template. This opens the Templates page, where you can preview the designs and set another one as your default.
Add your business details
Your company name appears on every invoice and as the sender name on invoice emails.
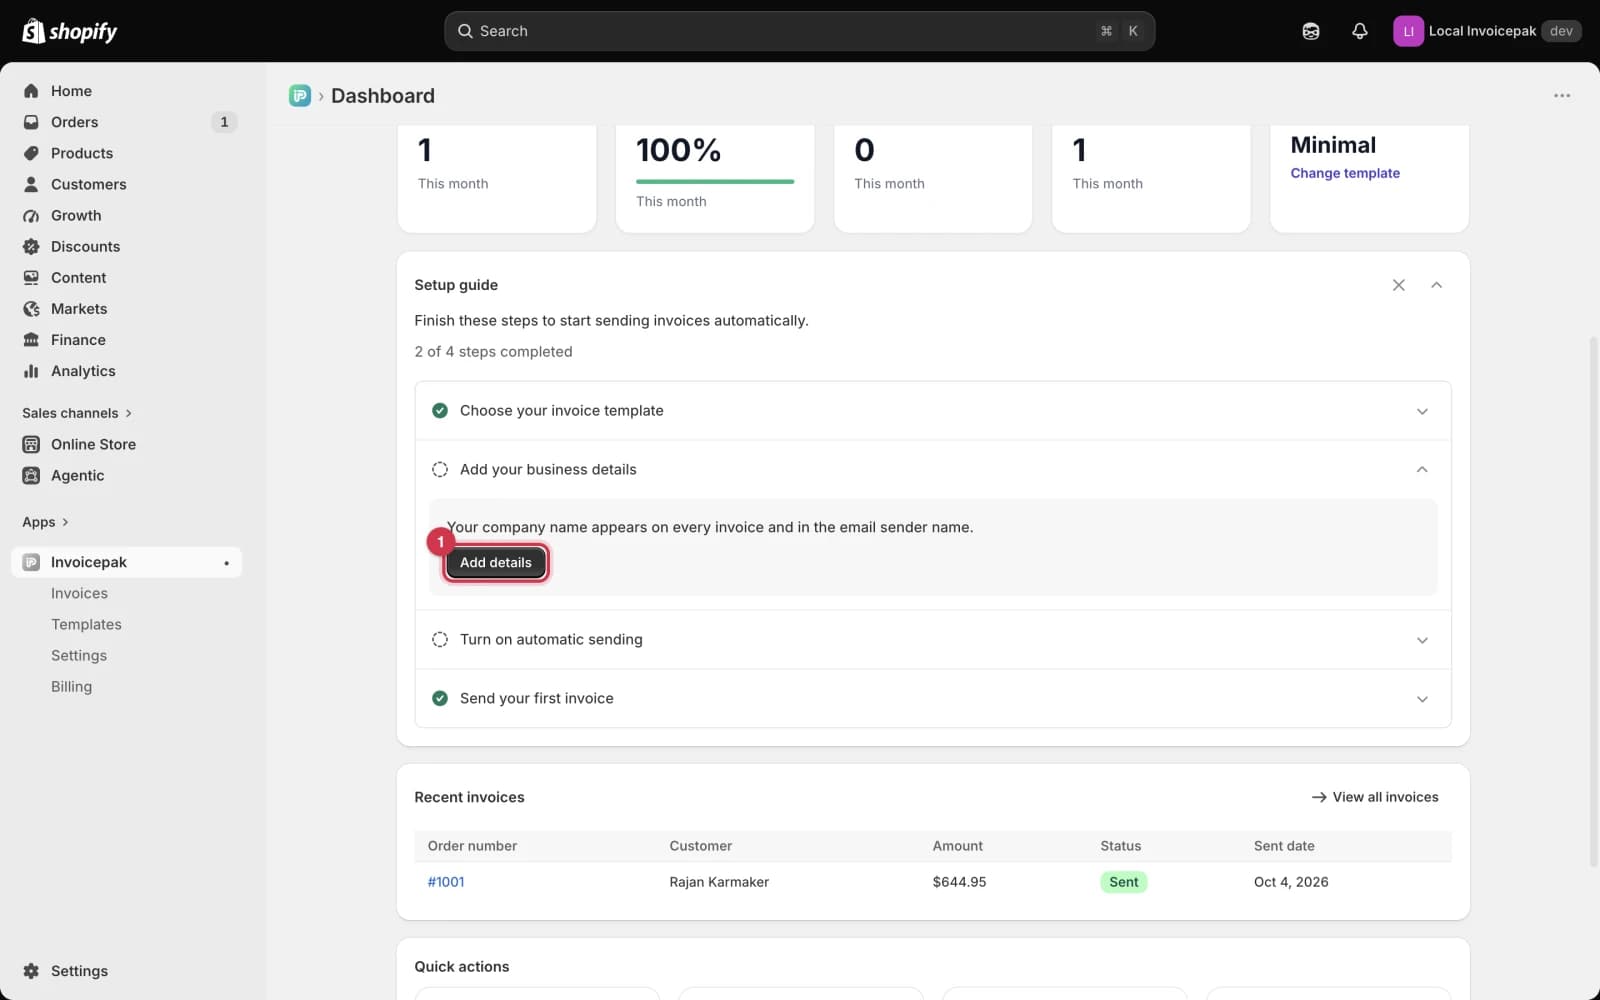
- Open the Add your business details step and click Add details. This opens Settings.
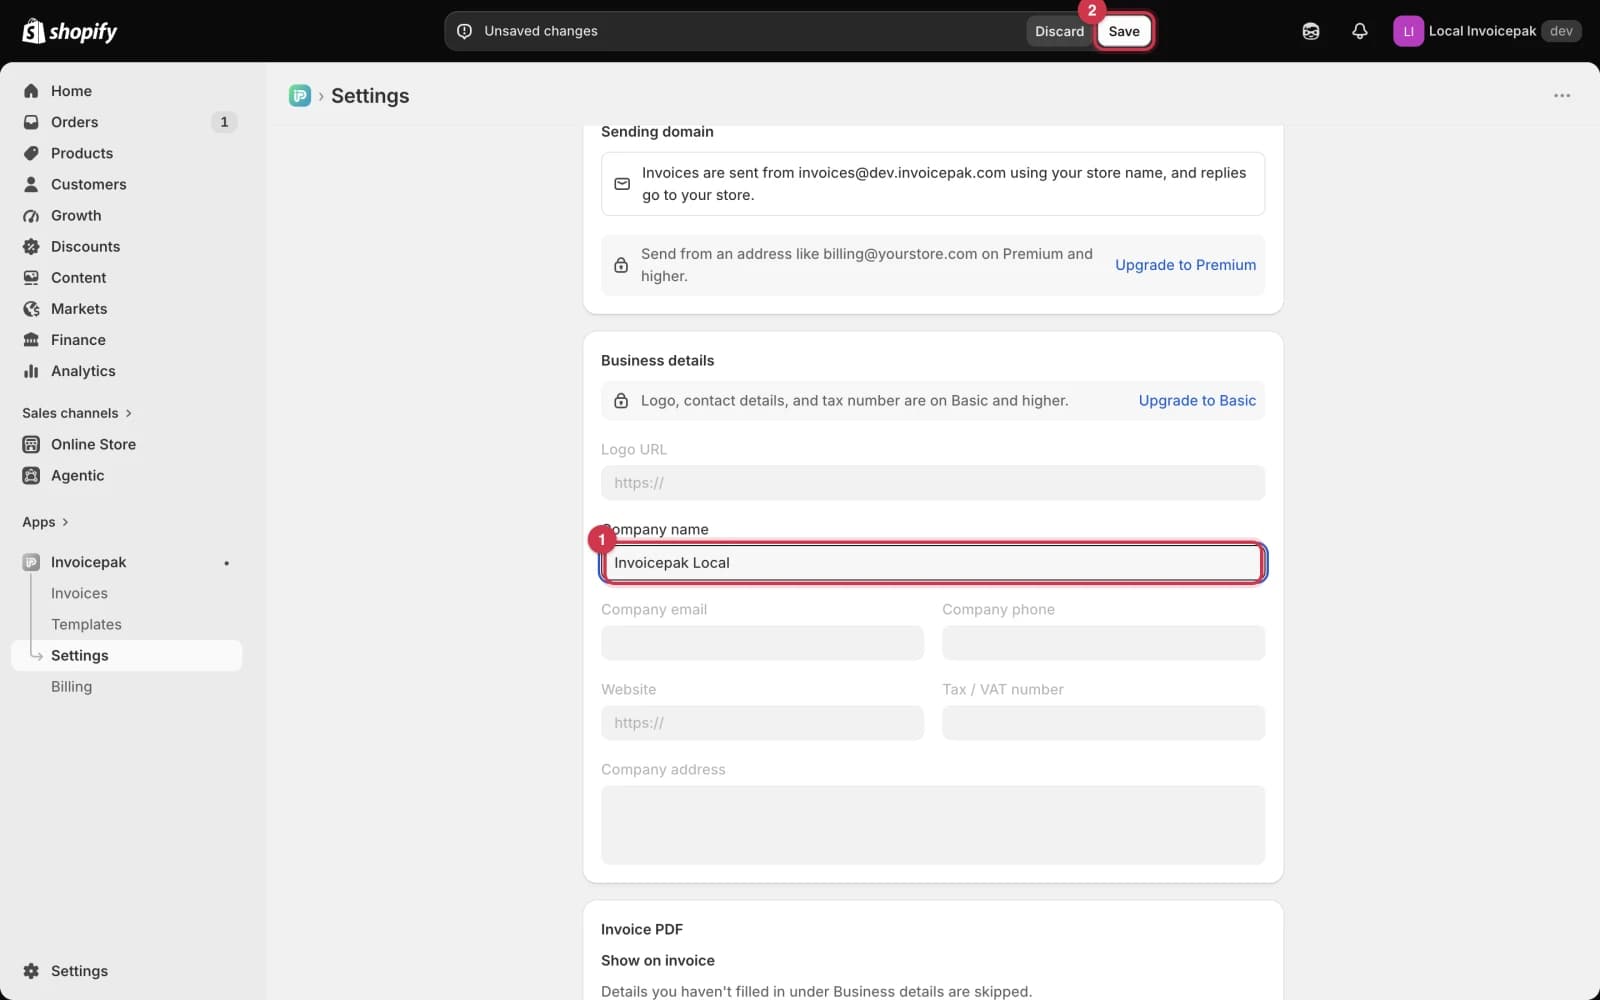
- Under Business details, type your business name in Company name.
- Click Save in the bar at the top of the page.
You'll see a Settings saved message, and the step gets a green check mark.
Turn on automatic sending
When automatic sending is on, Invoicepak emails an invoice to your customer as soon as an order is placed. It is on by default, so this step only needs your attention if you turned it off.
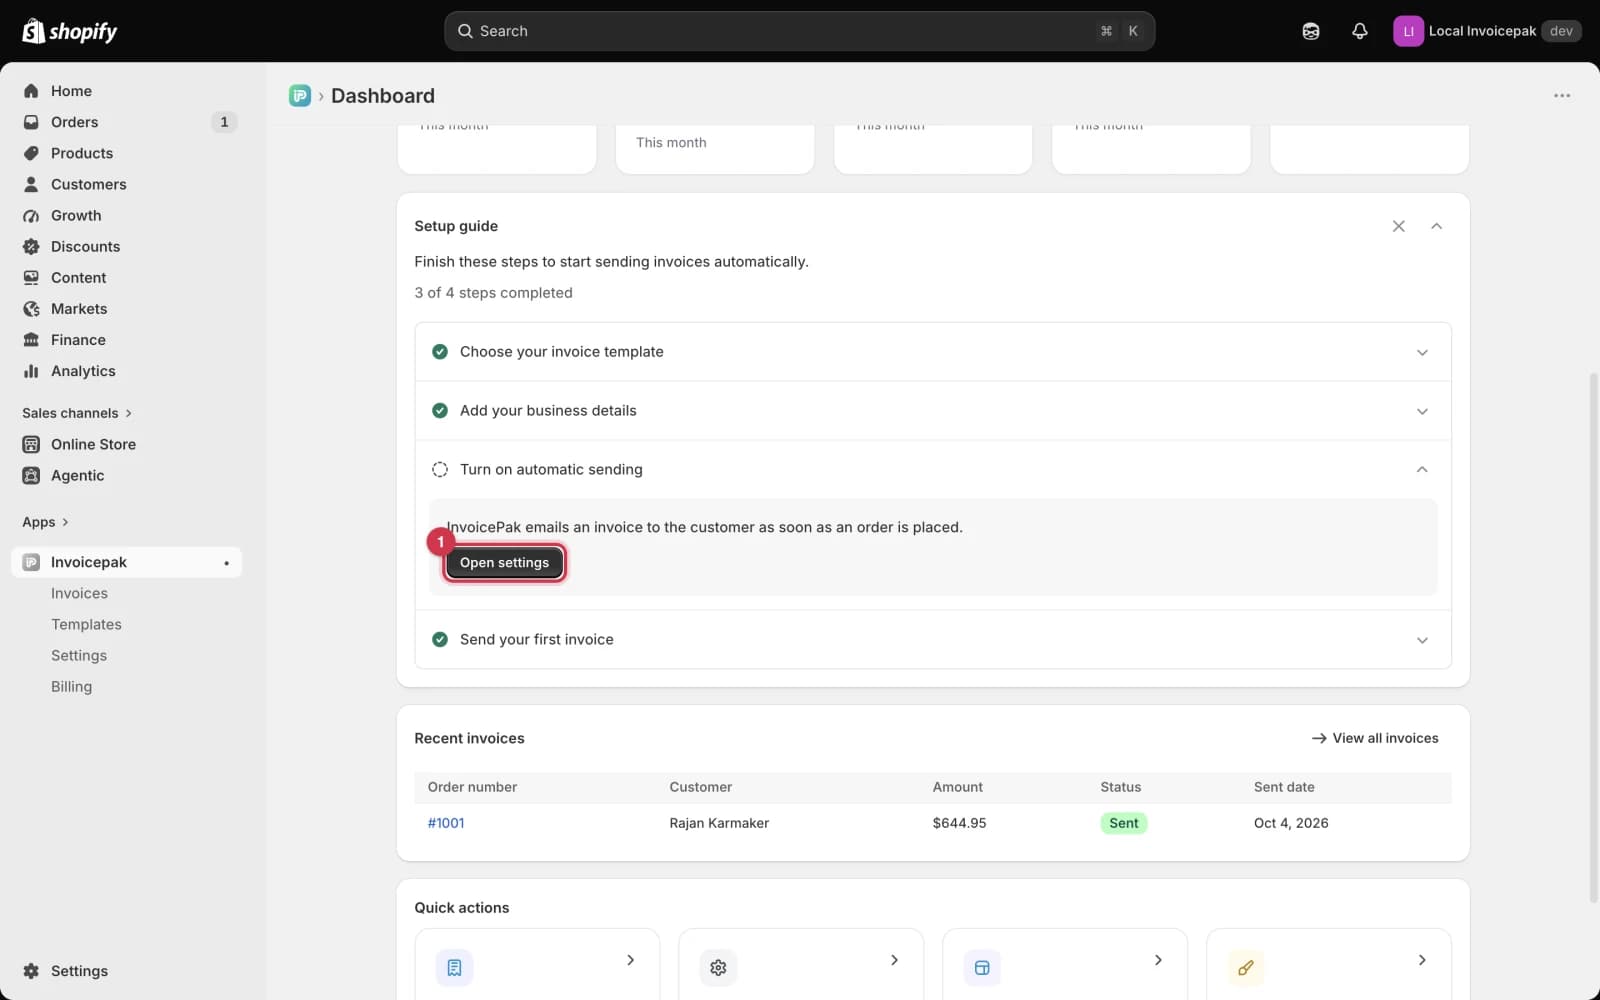
- Open the Turn on automatic sending step and click Open settings.
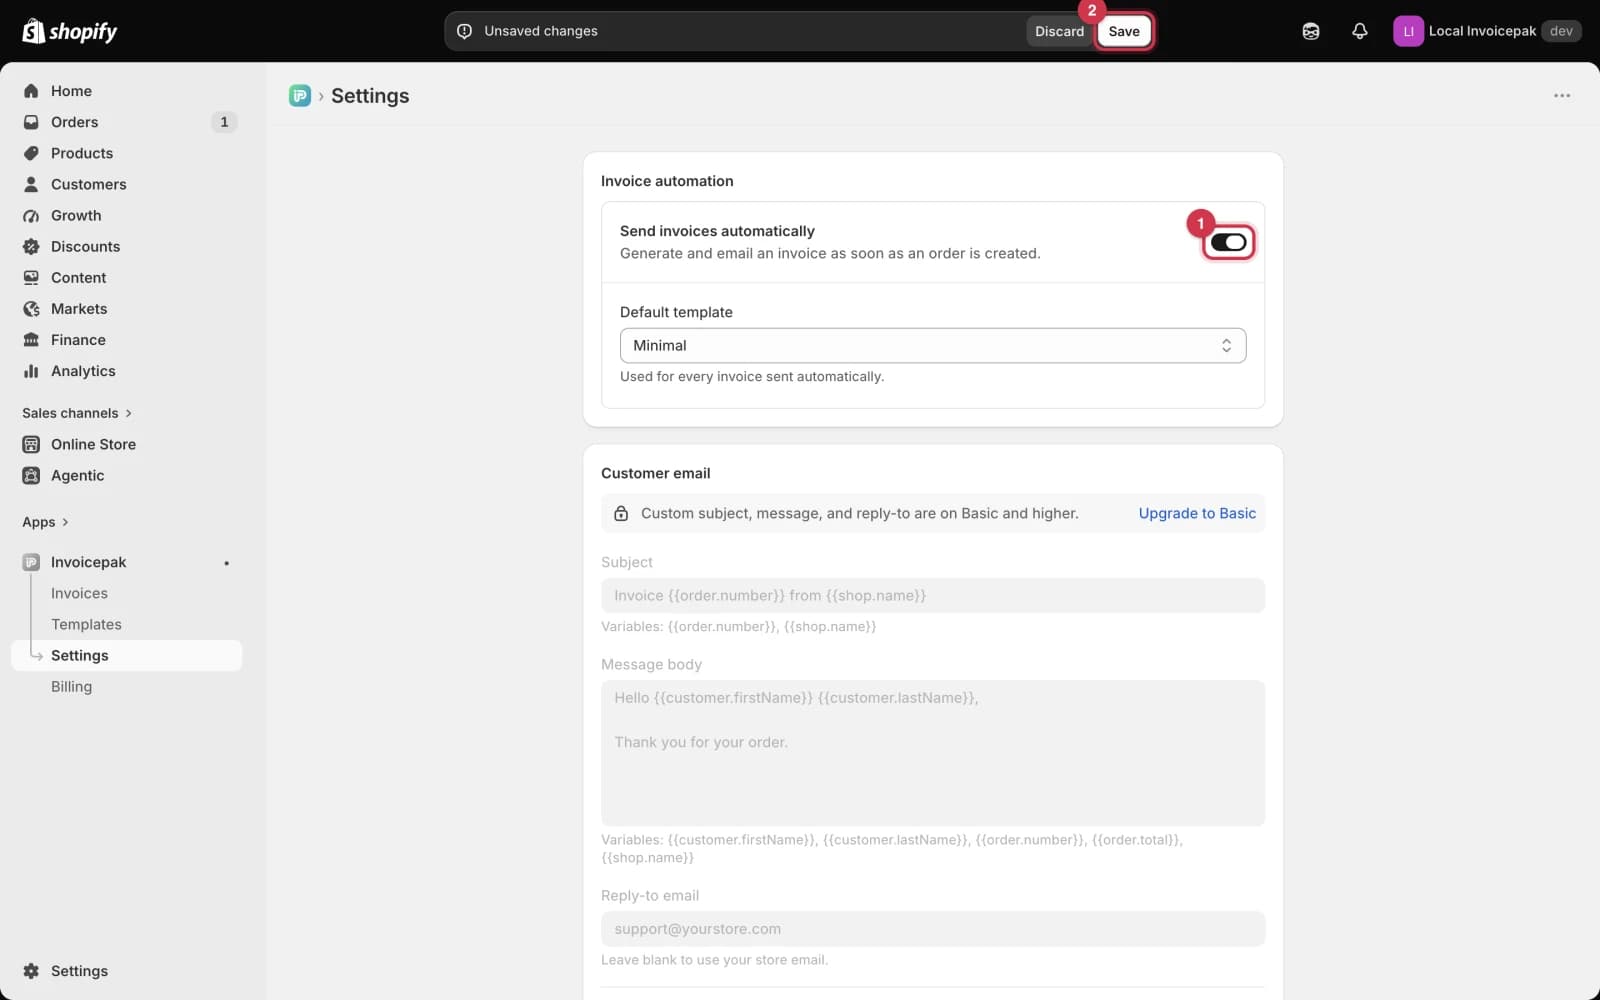
- Under Invoice automation, turn on Send invoices automatically. The switch is dark when it's on.
- Click Save at the top of the page.
The Default template dropdown below the switch sets which design these invoices use.
Send your first invoice
You have two ways to send your first invoice:
- Place a test order. With automatic sending on, Invoicepak emails the invoice to the address on the order within a few moments.
- Send one from an existing order, as described below.
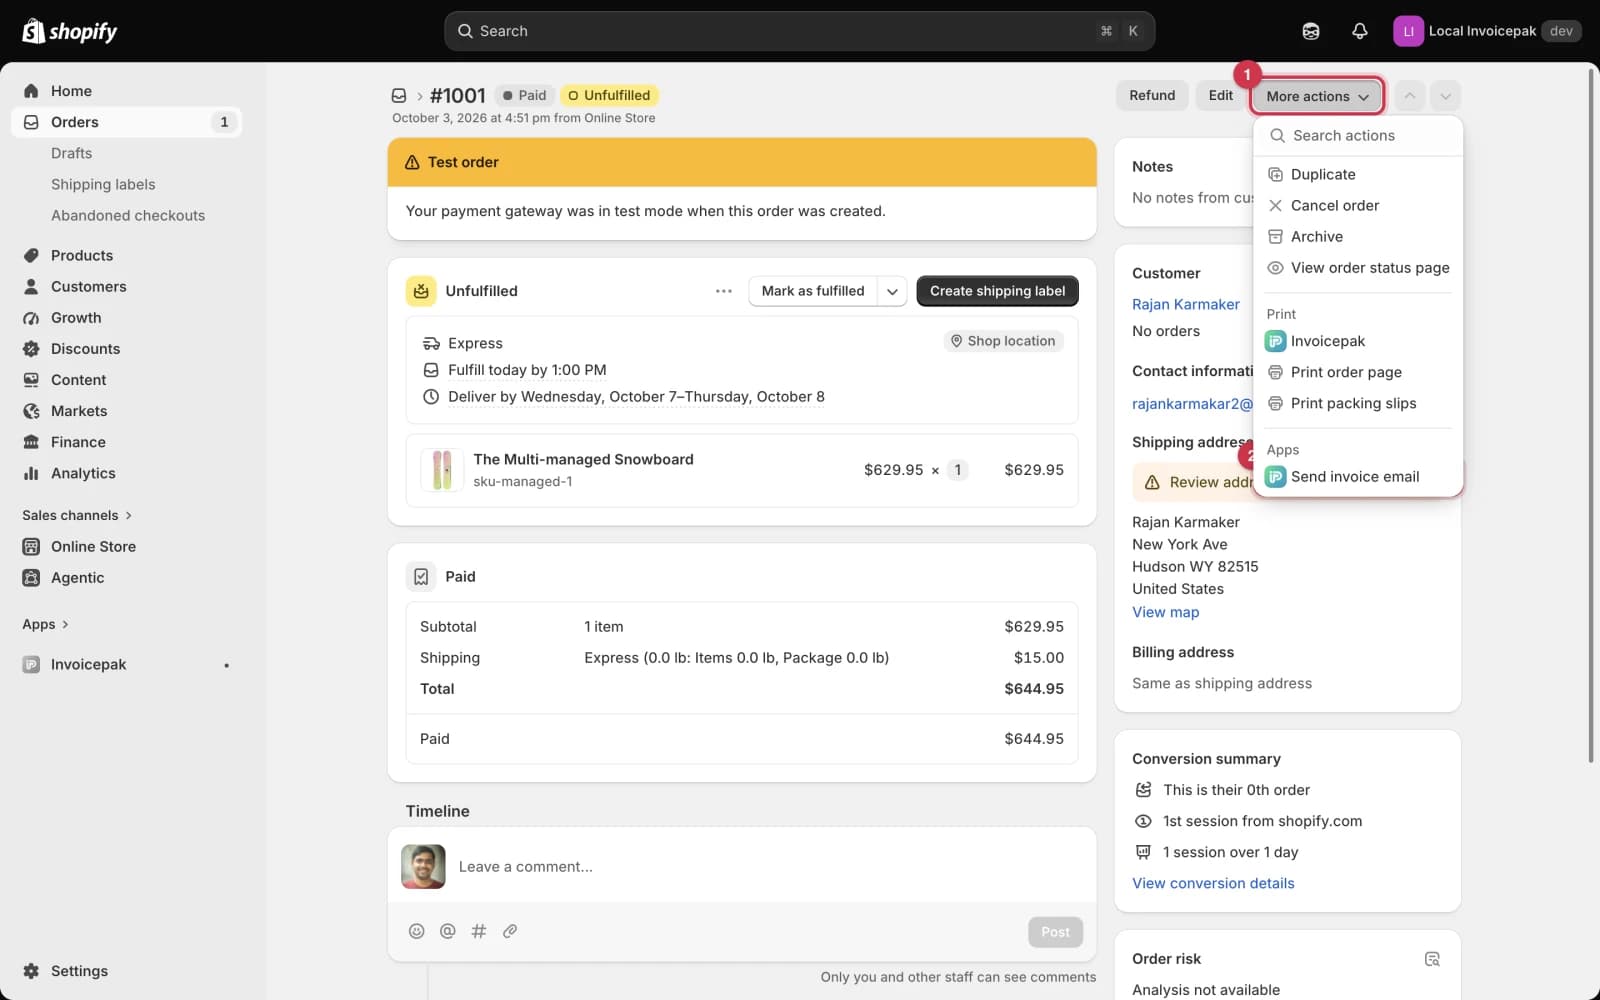
- In the Shopify admin, go to Orders and open any order. Click More actions at the top right.
- Under Apps, click Send invoice email. Check the email address and click Send.
This step completes on its own once an invoice has been sent. If you'd rather skip it, open the step and click Mark as done.
You're all set
When everything is set up, the status at the top of the Dashboard says Invoicing is on. It also names the template being used for new orders.
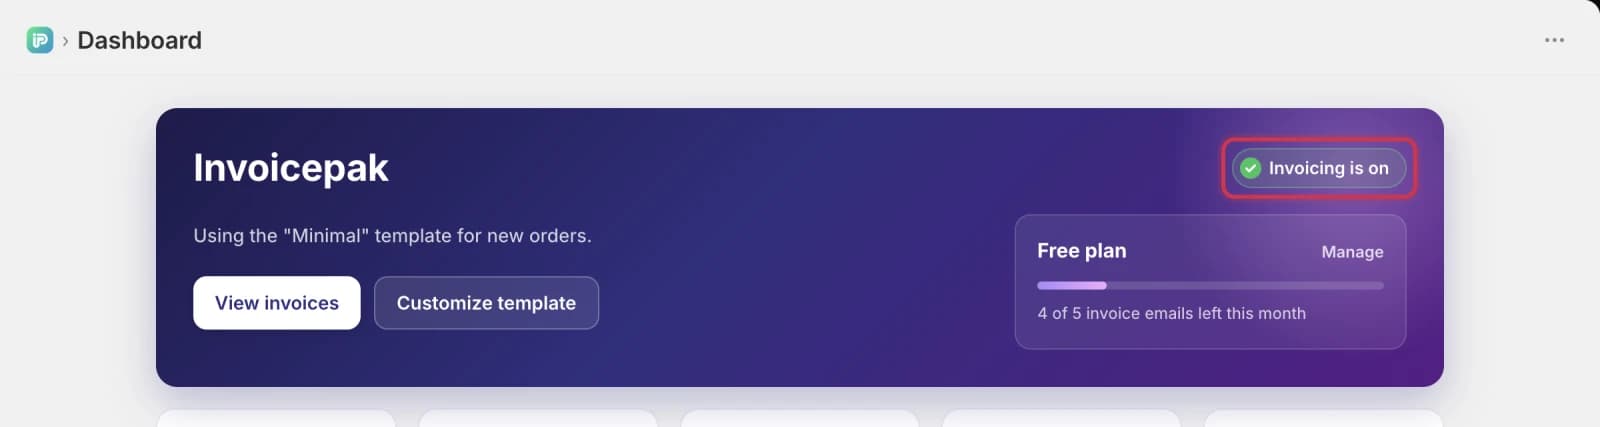
From now on, every new order gets a PDF invoice by email. You can find every invoice on the Invoices page.
Common questions
Do I have to pay to use Invoicepak?
No. The Free plan includes 5 invoice emails per month and all six starter templates. Upgrade when you need more emails or features.
Which orders get an invoice?
Every order placed after you install Invoicepak, while Send invoices automatically is on. Invoices are created when the order is placed. For older orders, use More actions → Send invoice email on the order.
What email address do invoices come from?
They're sent under your store's name, and replies go to your store email. On the Premium plan you can send from your own domain.
I dismissed the Setup guide by mistake. How do I get it back?
The guide can't be reopened, but every step is still available: Templates for the template step, Settings for business details and automatic sending, and Orders → More actions → Send invoice email for your first invoice.
The Dashboard says "Invoices aren't being sent yet". What do I do?
Your default template isn't published. Go to Templates, open the template's … menu, and choose Publish or Set as default.
Last updated