Send from your own email domain
On the Premium plan, send Invoicepak invoice emails from your own address, such as billing@yourstore.com. Add your domain, copy the DNS records and verify.
By default, invoice emails come from Invoicepak's address under your store name. On the Premium plan, you can send them from your own address instead, such as billing@acmecoffee.com. Customers recognise your domain, and fewer emails end up in spam.
You set this up once, in the Sending domain section of Settings:
- Add your domain in Invoicepak.
- Copy the DNS records Invoicepak shows you into your domain provider.
- Click Verify.
Before you start
You need:
- The Premium plan. See Plans & billing.
- A domain you own, such as
acmecoffee.com. A store address that ends in.myshopify.comwon't work. - Access to your domain's DNS settings. That's usually where you bought the domain, such as Shopify Domains, GoDaddy, Namecheap or Cloudflare. If someone else manages your website, ask them to add the records for you.
Open the Sending domain section
- In the Shopify admin sidebar, under Invoicepak, click Settings.
- Scroll down to Sending domain. It's between Customer email and Business details.
The box at the top of the section always shows the address your invoices are sent from right now.
Add your domain
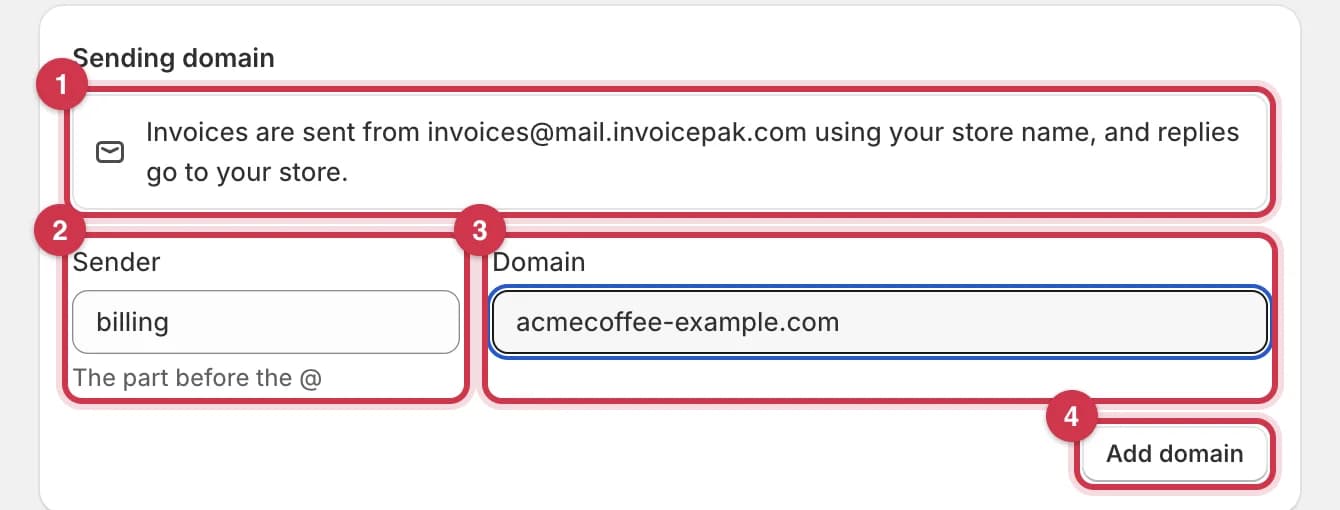
| Field | What it does | Default | Example | Plan needed |
|---|---|---|---|---|
| 1. Current sender (not a field) | Shows the address invoices are sent from right now. Before your domain is verified, it's Invoicepak's address, and replies still go to your store. | – | Invoices are sent from invoices@mail.invoicepak.com using your store name, and replies go to your store. | Every plan |
| 2. Sender | The part of the address before the @. Use lowercase letters, numbers, and . _ - +. It must start and end with a letter or number. Capital letters are made lowercase. | billing | invoices, accounts, hello | Premium |
| 3. Domain | The part of the address after the @. This is the domain you'll add DNS records to. You can paste a full web address like https://acmecoffee.com/, and Invoicepak keeps only acmecoffee.com. Subdomains such as mail.acmecoffee.com work too. | Empty | acmecoffee.com | Premium |
To add your domain:
- In Sender, type the part before the @, or keep
billing. - In Domain, type your domain, such as
acmecoffee.com. - Click Add domain.
The fields are replaced by your new address, a Waiting for DNS badge, and a table of DNS records. Nothing changes for your customers yet. Invoices keep coming from Invoicepak's address until your domain is verified.
Add the DNS records at your domain provider
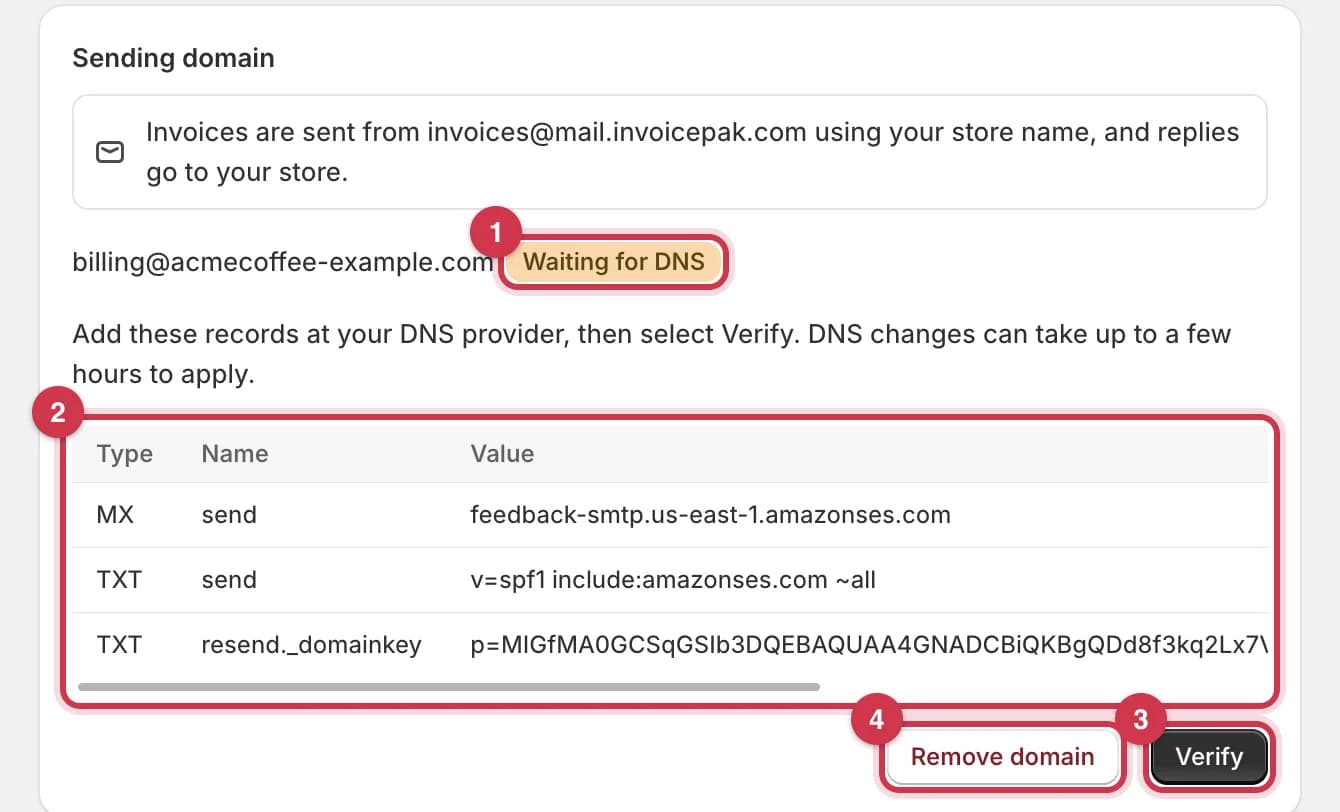
- Your new address is shown with the Waiting for DNS badge.
- The table lists the DNS records to add. There are usually three. Some values are long, so scroll the table sideways to see the Priority and Status columns.
- Verify checks your records. See Verify your domain.
- Changed your mind or typed the wrong domain? Click Remove domain. See Remove your domain.
To add the records:
- Sign in to your domain provider in a new browser tab and open the DNS settings for your domain.
- For each row in the table, add a new record. Copy Type, Name, Value and (for the MX record) Priority exactly as shown.
- Save the records at your domain provider.
- Back in Invoicepak, click Verify.
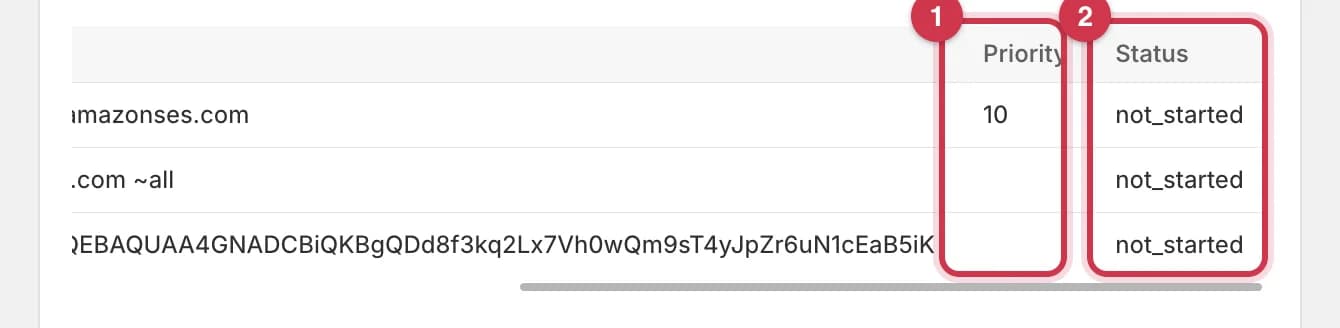
- Priority is only filled in for the MX record.
- Status shows how far each record has got. See Record statuses.
What each column means
| Column | What it means | Example |
|---|---|---|
| Type | The kind of record to create. Choose the same type at your provider. | MX, TXT |
| Name | Where the record goes. Most providers want only this part and add your domain for you. If yours asks for the full name, add your domain to the end. | send (or send.acmecoffee.com) |
| Value | What the record contains. Copy all of it. The long p=… value must be pasted in full, with no spaces or line breaks added. | v=spf1 include:amazonses.com ~all |
| Priority | Only for the MX record. If your provider asks for a priority, enter this number. | 10 |
| Status | Whether the record has been found yet. It updates when you click Verify. | not_started |
What the records are for
| Record | Name | What it's for |
|---|---|---|
| MX | send | Lets bounce messages for your invoice emails (for example, when a customer's address doesn't exist) come back to Invoicepak's email service. |
| TXT | send | An SPF record. It says Invoicepak's email service may send email for your domain. |
| TXT | resend._domainkey | A DKIM key. It signs your invoice emails so customers' inboxes can check they really came from you. |
All three are on their own names (send and resend._domainkey), so they don't touch your website or the email inbox you already use on your domain.
Verify your domain
DNS changes can take anywhere from a few minutes to a few hours to work.
- Go back to Settings → Sending domain.
- Click Verify.
Invoicepak checks your records and updates the badge and the Status column:
- Verified: you're done. See When your domain is verified.
- Waiting for DNS: the records haven't been found yet. Wait a while and click Verify again.
- Verification failed: see When verification fails.
The badge only changes when you click Verify. It doesn't update by itself, so come back and click it again after you've added the records.
When verification fails
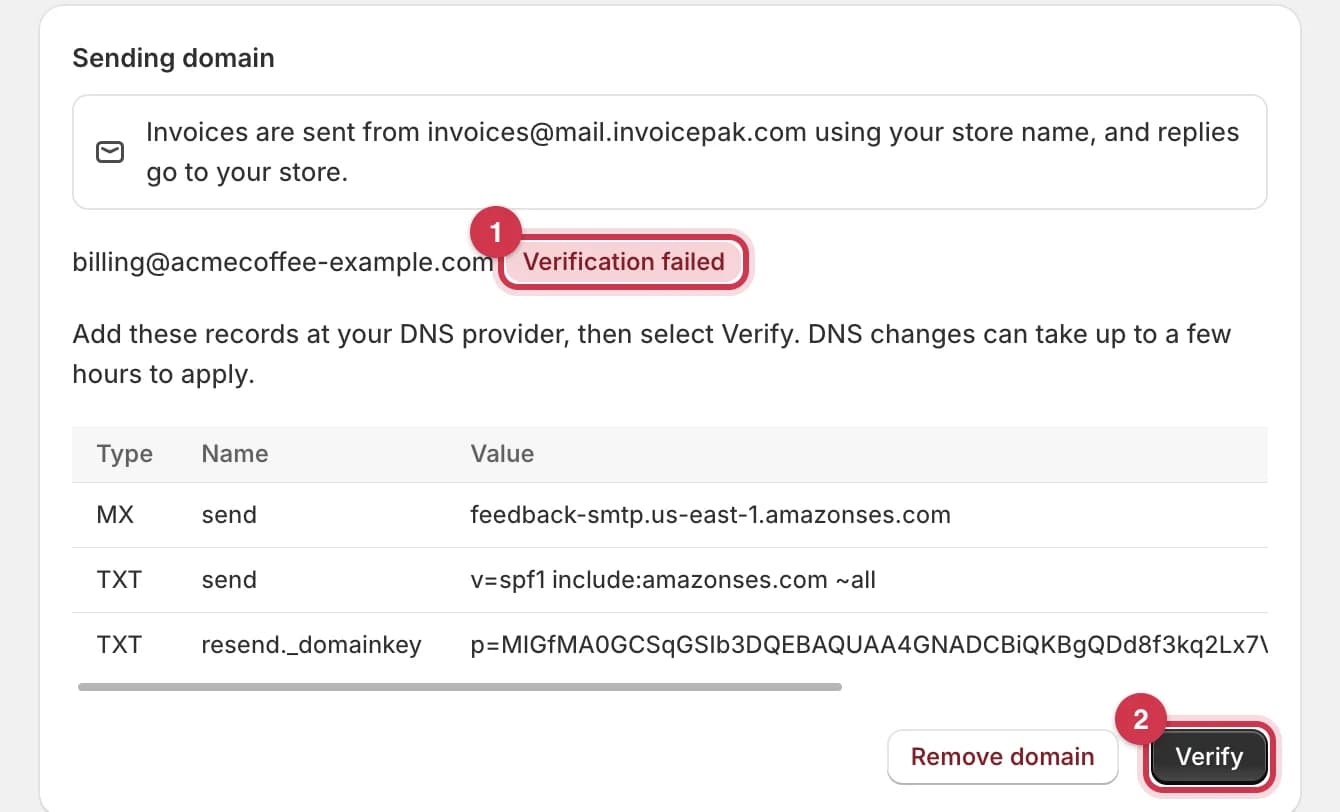
- Verification failed means at least one record was missing or wrong when checked.
- Click Verify again once you've fixed the record.
To fix it:
- Look at the Status column to see which record failed.
- At your domain provider, compare that record with the table. Check that the Name isn't doubled (
send.acmecoffee.com.acmecoffee.com) and that the Value was copied in full. - Wait a few minutes, then click Verify again.
When your domain is verified
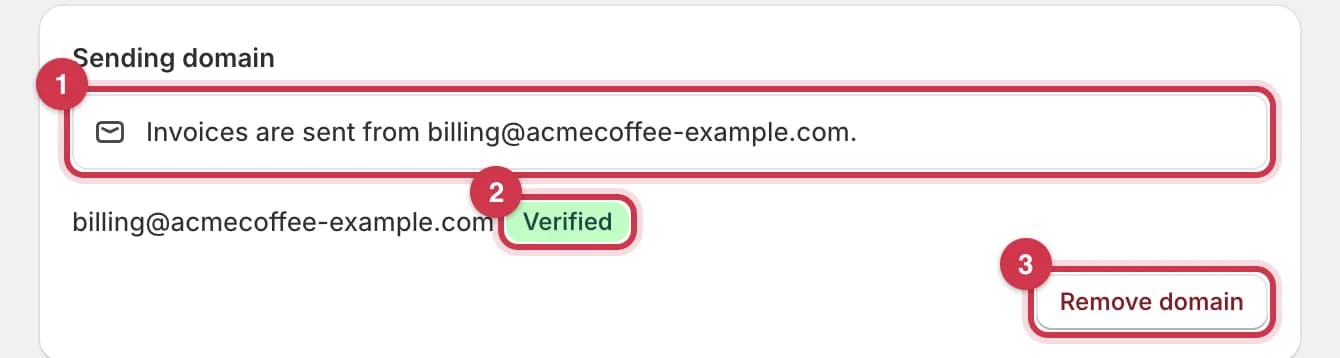
- The box now says Invoices are sent from your address, such as
billing@acmecoffee-example.com. - The badge says Verified. The DNS records table and the Verify button are hidden.
- Remove domain is still there if you want to go back to Invoicepak's address.
From now on, every invoice email is sent from your address:
- invoices sent automatically when an order is created
- Resend and Retry on the Invoices page
- Send invoice email on a Shopify order
- Send test email in the template editor
Your Company name (or store name) is still shown as the sender name. Replies still go to your Reply-to email (or your Company email, or your Shopify store email). See Set a reply-to address.
The domain statuses
Badge
| Badge | What it means | What to do | Invoices are sent from |
|---|---|---|---|
| Waiting for DNS | You've added the domain, but the records haven't been found yet. | Add the records, wait, then click Verify. | Invoicepak's address |
| Verification failed | At least one record was missing or wrong when checked. | Fix the record, wait, then click Verify. | Invoicepak's address |
| Verified | All records were found. | Nothing. Keep the records in place. | Your address |
Record statuses
The Status column shows one word for each record:
| Status | What it means |
|---|---|
not_started | Not checked yet. You'll see this before you first click Verify. |
pending | Being checked. Click Verify again in a few minutes. |
verified | Found and correct. |
failed | Not found, or the value doesn't match. Fix it at your domain provider. |
temporary_failure | The check couldn't finish this time. Click Verify again later. |
Remove your domain
In Settings → Sending domain, click Remove domain.
There's no confirmation step. Your domain is removed straight away, the Sender and Domain fields come back, and invoices go back to being sent from Invoicepak's address.
You can then add a different domain, or the same one again. After removing, you can delete the three DNS records at your domain provider if you no longer need them. If you add the domain again later, you'll need to add the records shown at that time.
Error messages
If something goes wrong, a red message appears at the top of the section:
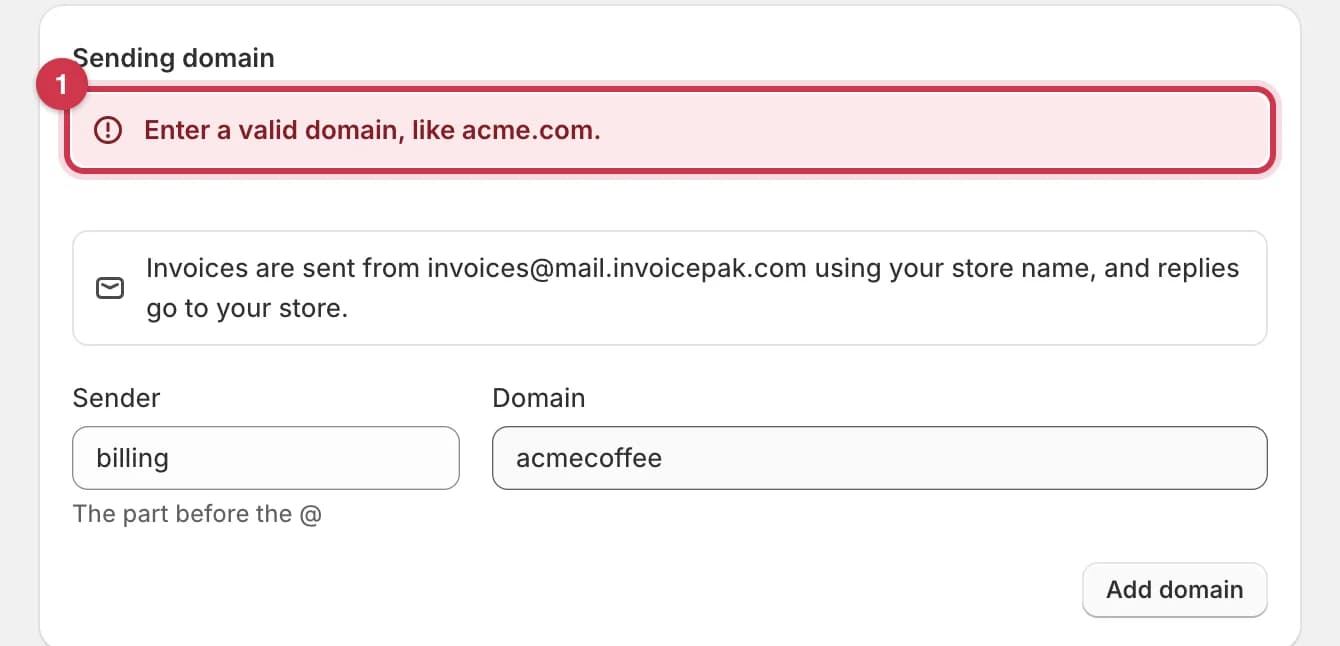
- Read the message, fix the field, and click the button again.
| Message | Why | How to fix it |
|---|---|---|
| Enter a valid domain, like acme.com. | The Domain is empty, has no dot, or has characters a domain can't have. | Type a domain like acmecoffee.com. Don't include the sender or the @. |
| Enter a valid sender name, like billing. | The Sender is empty, or has spaces, an @, or other characters that aren't allowed. | Use letters, numbers, . _ - or +, such as billing. |
| That domain belongs to Invoicepak. Use your store's own domain. | You entered Invoicepak's own sending domain. | Enter a domain you own. |
| Remove your current sending domain before adding another. | A domain is already added, for example from another browser tab. | Reload the page. To use a different domain, click Remove domain first. |
| Upgrade to Premium to send from your own domain. | Your store isn't on Premium. | Upgrade to Premium. See Change your plan. |
| Any other message | Invoicepak's email service couldn't add or check the domain. | Wait a few minutes and try again. If it keeps happening, contact Invoicepak support and include the message. |
Which plan do I need?
| Feature | Free | Basic | Pro | Premium |
|---|---|---|---|---|
| Invoice emails under your store name, from Invoicepak's address | ✓ | ✓ | ✓ | ✓ |
| Custom Reply-to email | – | ✓ | ✓ | ✓ |
| Send from your own email domain | – | – | – | ✓ |
On Free, Basic and Pro, the section shows the current sender and a locked line: Send from an address like billing@yourstore.com on Premium and higher. Click Upgrade to Premium next to it to open Billing.
Common questions
Do I need my own domain to use Invoicepak?
No. Without one, invoices are sent from Invoicepak's address, with your store name as the sender name. Replies still go to you.
Will this change my website or my normal email?
No. The records go on their own names (send and resend._domainkey), so your website and your existing inbox keep working as before.
Can I receive email at the sender address?
Invoicepak only sends from it. Customer replies go to your Reply-to email, not to the sender address. If you want replies at the same address, set it as your Reply-to email too and make sure that inbox exists.
How long does verification take?
Often a few minutes, sometimes a few hours, depending on your domain provider. Click Verify again until the badge says Verified.
I clicked Verify and nothing changed.
The records may not be visible yet. Wait, then click Verify again. If it stays the same for more than a day, check each record against the table.
Can I use a .myshopify.com address?
No. You need a domain you own and can add DNS records to.
Can I use a subdomain, like mail.acmecoffee.com?
Yes. Type it in Domain and add the records it shows. Your invoices will come from an address like billing@mail.acmecoffee.com.
Can I change the sender, like billing to invoices?
Remove the domain, then add it again with the new Sender. You'll need to add the DNS records shown at that time and click Verify again.
Can I use more than one domain?
No. One sending domain per store.
Do test emails use my domain?
Yes. Once your domain is verified, Send test email in the template editor sends from your address too, so it's a good way to check that everything works.
Last updated