Invoice automation & customer email
Turn automatic invoices on or off, choose the default template, and write the invoice email your customers receive, with reply-to and PDF options.
This page covers the first two sections of Settings:
- Invoice automation decides whether new orders get an invoice automatically, and which template it uses.
- Customer email decides what the invoice email says, where replies go, and whether the PDF is attached.
To open them, click Settings under Invoicepak in the Shopify admin sidebar. Invoice automation is the first section on the page, and Customer email is right below it.
Invoice automation
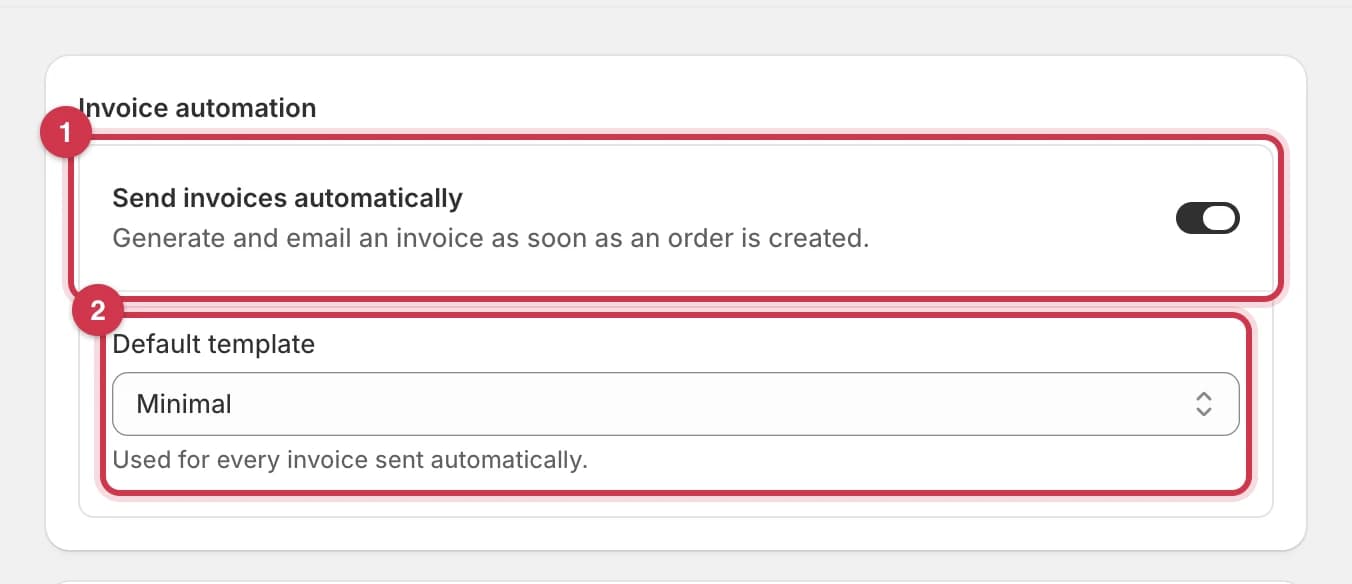
| # | Field | What it does | Default |
|---|---|---|---|
| 1 | Send invoices automatically | When it's on, Invoicepak creates a PDF invoice and emails it to the customer as soon as an order is created. | On |
| 2 | Default template | The design used for every invoice sent automatically. It's also used when you send, print or download an invoice from an order. | Minimal |
Both work on every plan, including Free.
Turn automatic sending on or off
- Click the Send invoices automatically switch. The switch is dark when it's on.
- Click Save at the top of the page.
When it's on, every order created from now on gets an invoice email, as long as the order has a customer email address. Each email counts towards your plan's monthly limit.
When it's off, new orders don't get an invoice, and the Dashboard shows Automatic sending is off. You can still send an invoice for any order with More actions → Send invoice email on the order page.
Choose the default template
- Click the Default template dropdown.
- Choose a template.
- Click Save at the top of the page.
The dropdown lists all your templates, such as Minimal, Modern, Professional, Elegant, Bold and Compact. A template that isn't published yet has (draft) after its name.
If you choose a draft and click Save, you'll see Publish this template before setting it as default. under the dropdown. Go to Templates and publish the template, then come back and choose it again, or choose a template that's already published.
You can also set the default template from the Templates page. If you have no templates at all, this section says No templates yet with a Create one link instead of the dropdown.
Customer email
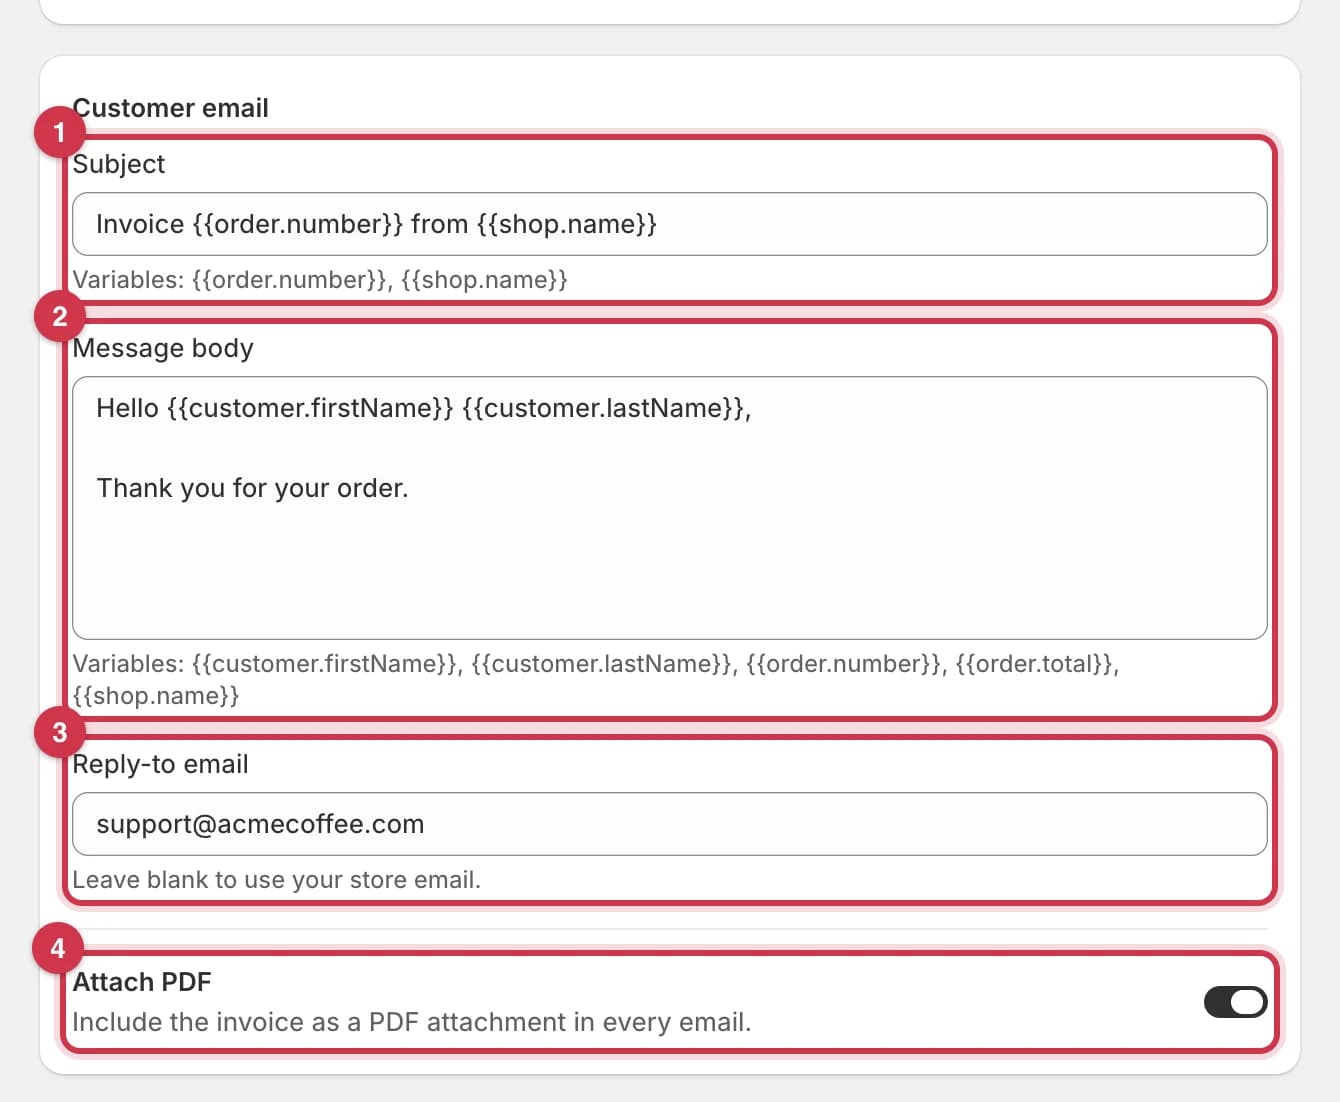
Every field at a glance
| # | Field | What it does | Default |
|---|---|---|---|
| 1 | Subject | The subject line of the invoice email. Can include variables. One line, up to 200 characters. | Invoice {{order.number}} from {{shop.name}} |
| 2 | Message body | The message at the top of the email. Can include variables. Leave an empty line between paragraphs. Up to 5,000 characters. | Hello {{customer.firstName}} {{customer.lastName}}, then a blank line and Thank you for your order. |
| 3 | Reply-to email | Where your customer's reply goes when they click Reply. | Empty: replies go to your Company email, or to your Shopify store email if that's empty |
| 4 | Attach PDF | When it's on, the invoice PDF is attached to every invoice email. | On |
Write the subject and message
- In Subject, type the subject line, for example
Your {{shop.name}} invoice for order {{order.number}}. - In Message body, type your message. Press Enter twice to start a new paragraph.
- Click Save at the top of the page.
For example, this message thanks the customer by first name and mentions the total:
Hi {{customer.firstName}},

Thanks for shopping with us! Your invoice for {{order.total}} is attached.
Use variables
A variable is a word in double curly brackets, such as {{order.number}}, that's replaced with the order's details when the email is sent. The hint under each field lists the most useful ones:
| Variable | Becomes | Example |
|---|---|---|
{{order.number}} | The order number | #1001 |
{{shop.name}} | Your Company name, or your store name if that's empty | Acme Coffee Roasters Ltd. |
{{customer.firstName}} | The customer's first name | Jane |
{{customer.lastName}} | The customer's last name | Cooper |
{{order.total}} | The order total, with currency | $48.50 |
See the Variables reference for every variable you can use.
If a variable has no value or is misspelled:
- In the Message body, it's removed and the spacing is tidied up. For example,
Hello {{customer.firstName}},becomesHello,for a guest checkout with no name. - In the Subject, it's left exactly as you typed it, so double-check the spelling.
Set a reply-to address
- In Reply-to email, type the address you want replies to go to, for example
support@acmecoffee.com. - Click Save at the top of the page.
Leave it empty to use your Company email from Business details. If that's empty too, replies go to your Shopify store email.
Attach the PDF or not
- Click the Attach PDF switch. It's dark when it's on.
- Click Save at the top of the page.
The attachment's file name is set under Invoice PDF → PDF file name.
What your customer receives
This is the email your customer receives with the default settings.
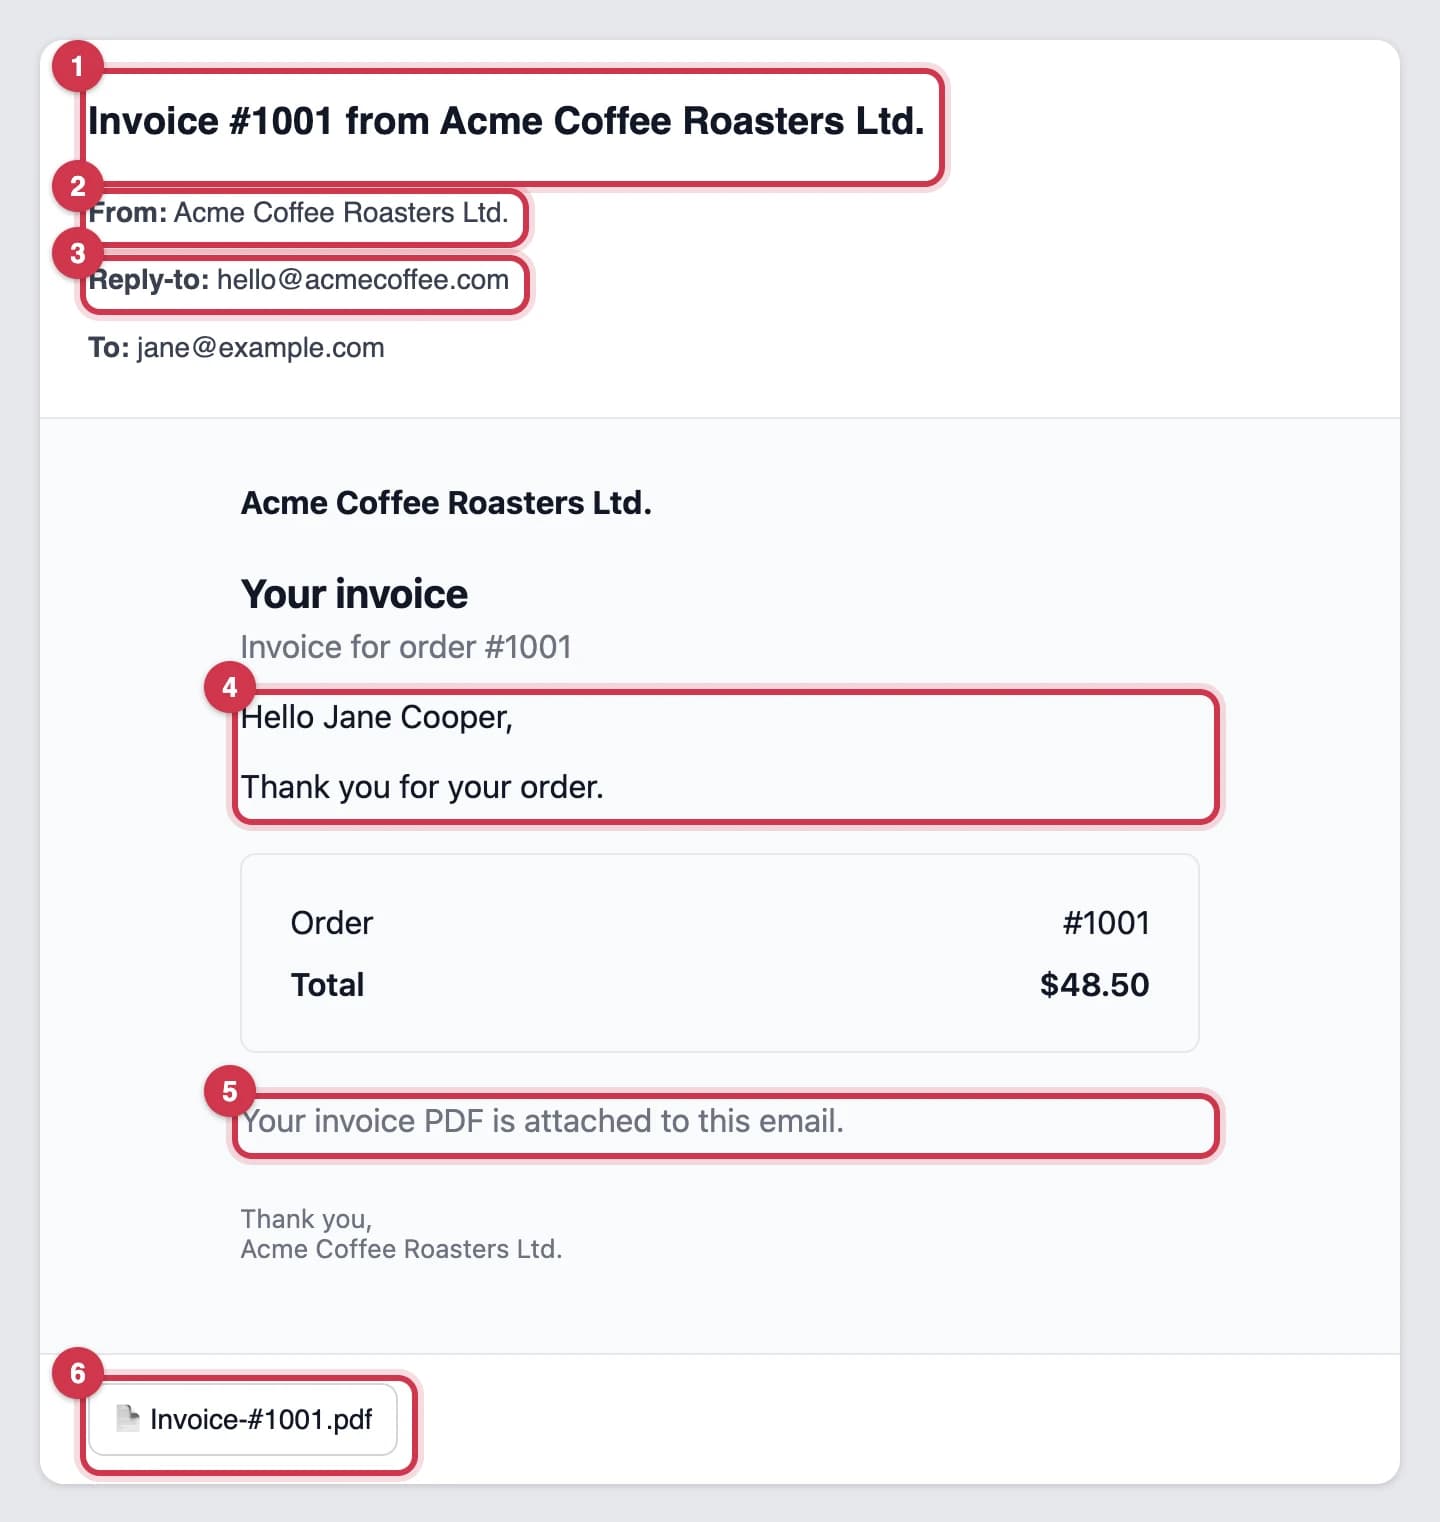
- The Subject, with the variables filled in.
- The sender name is your Company name (or your store name).
- The Reply-to email (or your Company email).
- Your Message body, with the variables filled in.
- This line appears only when Attach PDF is on.
- The invoice PDF attachment.
Your logo appears at the top of the email if you've set a Logo URL in Business details. Otherwise your company name is shown. The order number and total are always included, and the email ends with "Thank you," and your company name.
Save or discard your changes
As soon as you change anything, a bar appears at the top of the page.
- Click Save to keep your changes. You'll see a Settings saved message.
- Click Discard to undo every unsaved change on the page.
The Business details page has screenshots of the save bar.
If something can't be saved, the field is outlined in red with a message under it. Fix the field, then click Save again.
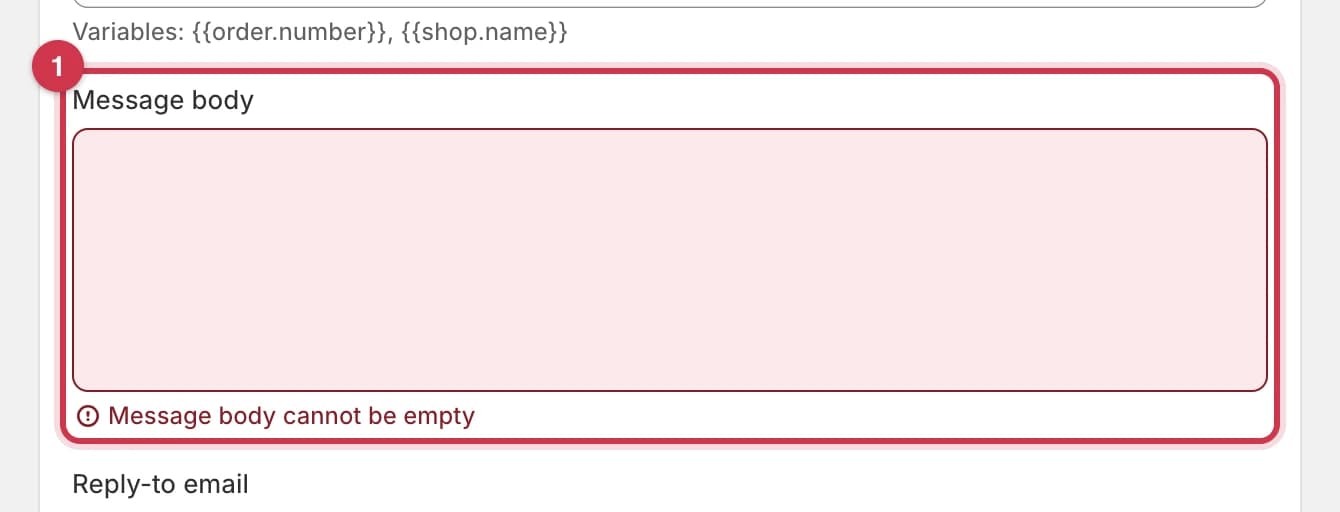
| Field | Message | How to fix it |
|---|---|---|
| Subject | Too small: expected string to have >=1 characters (the subject is empty) | Type a subject, or paste the default: Invoice {{order.number}} from {{shop.name}} |
| Message body | Message body cannot be empty | Type a message |
| Reply-to email | Invalid email address | Type a full address like support@acmecoffee.com, or leave it empty |
| Default template | Publish this template before setting it as default. | Choose a published template, or publish this one first |
Which plan do I need?
Send invoices automatically, Default template and Attach PDF work on every plan. Subject, Message body and Reply-to email need the Basic plan or higher. The number of invoice emails per month also depends on your plan: 5 on Free, 300 on Basic, 600 on Pro and unlimited on Premium.
On the Free plan, Subject, Message body and Reply-to email are greyed out, and your emails use the default subject and message.
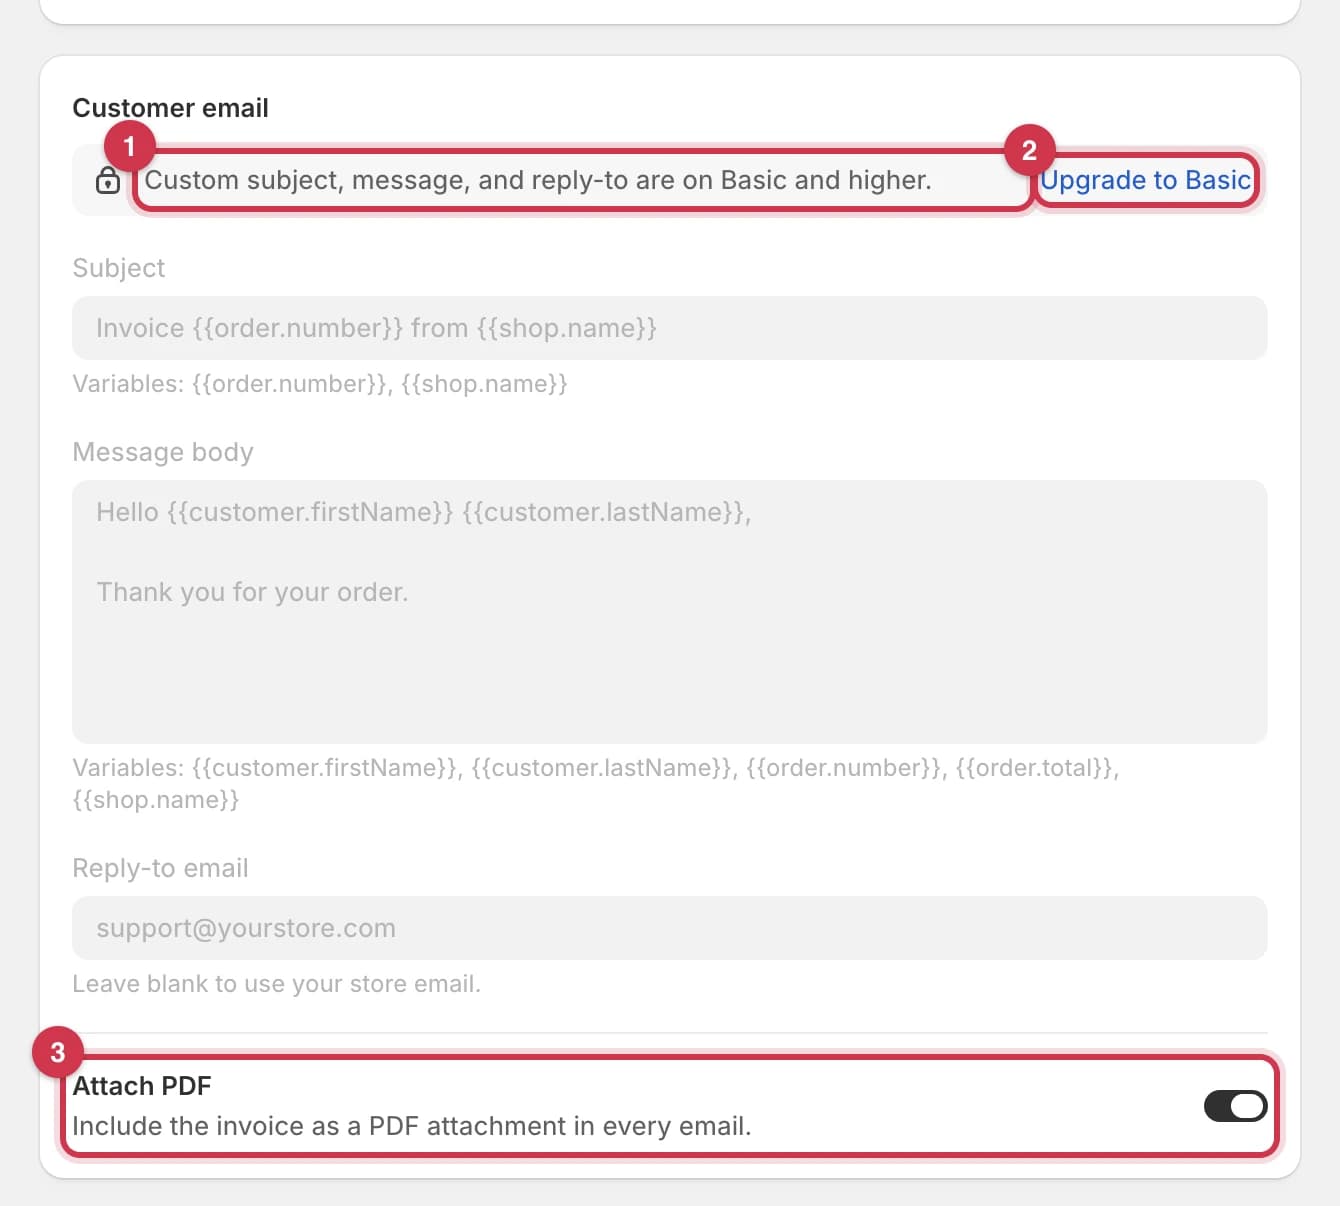
- The message explains which fields are locked.
- Click Upgrade to Basic to open Billing and choose a plan.
- Attach PDF works on every plan.
Common questions
Why didn't an order get an invoice?
Check the Invoices page for the order. The most common reasons are:
- Send invoices automatically was off when the order was created.
- The order has no customer email address.
- You've used all of this month's invoice emails.
- The customer's address bounced before, or they marked an earlier invoice as spam.
Do test orders get an invoice?
Yes. Any order created while automatic sending is on gets one, including test orders, and it counts towards your monthly limit.
Does changing the default template change invoices already sent?
No, emails already sent don't change. But when you download, print or resend an invoice later, it uses your current default template.
Can I send a test email to myself?
Yes, from the template editor with Send test email. See Send a test email. Test emails don't count towards your monthly limit.
Can I use HTML or formatting in the message?
No. The message is plain text. Line breaks and empty lines between paragraphs are kept.
Why does my subject show {{order.numbr}}?
The variable is misspelled, so it's left as typed. Fix the spelling and click Save.
Last updated